Thursday, 30 April 2020

Business Process Step Types

Business Process Step Types

For better understanding on Business Process Step types, below shows the categorization of the same. 

User Input                     : Needs an input from the user (You see these typically in the inbox as tasks )
Approval                       : Needs approval from a specific security group (Manager, HR Partner, etc.)
Background Processing: These step types does not need any user intervention. Taken care by Workday.

Business Process: Rescind vs Cancel

Business Process: Rescind vs Cancel

Rescind vs Cancel

Its very important to understand the difference between Rescind and Cancel with in Business Processes. At times you get confused as why you are not seeing Rescind option or Cancel option during or after completing the BP.

Rescind is like rolling back your BP.- You will happen to see this 'Rescind' only when the process is in a status of "Successfully Completed"
It completely reverses all changes made to Workday data.
- Can only be done by security groups with appropriate permission (Role: Business Process Administrator)

Cancel is like aborting the BP in the middle.- You will happen to see this 'Cancel' only when the process is in status of "In Progress"
- It completely reverses all changes made to Workday data.
- Can be done by security groups with appropriate permission as well as worker who initiated the process.

Where to set Job Application Stage Order

Job Application Stage Order


Open the task Edit Tenant Setup - Recruiting to access Job application stage order at the end.

This sequence helps in setting up your organization's Job Application order in recruiting.

Don't forget, always Review stage comes first and the last will be Ready for Hire stage.

How to exclude the Notification details link - Business Process

How to exclude the Notification details link - Business Process


In business Processes, you know that you will be able to configure the custom notifications. Usually you will see the link in the notification that gets generated. There could be different reasons ( like security, don't need to give extra details) as why you don't want to show up the link to the process. 

Go to Edit Workflow Notification and check the check box as shown below. This helps in not showing the link details.


Workday Assistant / Chat Bot

Workday Assistant / Chat Bot


Workday Assistant / Chat Bot is the new feature with release R1 2020(34)
We can enable users to perform HCM related tasks and retrieve Workday information by having a conversation with the Assistant chatbot.


Examples:
  • Show my playslip
  • Request time off and view balances.
  • View worker and manager information.
  • Initiate a location or supervisory organization change.

Workday also supports Assistant on mobile.

Assistant doesn't support proxy users.

In Non-Production tenants, when you proxy as some one, the bot will still consider you as the user and provide your information and not the one whom you are proxy-ing. Which is correct.

Workday XML - XSL Tranformation

XML - XSL Tranformation - Free online Formatter


Workday XML - XSL Tranformation


Abbreviations:
XML Stands for eXtensible Markup Language
XSL Stand for eXtensible Stylesheet Language (Styling language for XML)
XSLT stands for XSL Transformations.


If you do not have any xsl transformers installed on your local machine,  I suggest you to use online free formatter to test your xml to xslt conversion and see how your end data looks like after applying your transformation code.

Follow the below three steps, to transform your xml.
  1. XML input - Copy Paste / Attach your generated workday xml code.
  2. XSL input  - Copy Paste / Attach your own custom code in relation to your xml.
  3. Transform XML - Click this to see the result.
Click the below link to format your code.

Just a word of caution: Make sure, you avoid any confidential data in your xml file while using free online formatters

Workday XML - XSLT Sample codes

XML - XSLT Sample codes

Use the below sample code to start with your XSLT journey. I made it as simple as possible for you to understand and get going.

XML Sample:

<?xml version="1.0" encoding="UTF-8"?>
<wd:Report_Data xmlns:wd="urn:com.workday.report/WD_Sample_Report">
  <wd:Report_Entry>
    <wd:Employee_ID>1234</wd:Employee_ID>
    <wd:firstName>Steve</wd:firstName>
    <wd:lastName>Morgan</wd:lastName>
    <wd:Age>56</wd:Age>
  </wd:Report_Entry>
  <wd:Report_Entry>
    <wd:Employee_ID>1235</wd:Employee_ID>
    <wd:firstName>Logan</wd:firstName>
    <wd:lastName>McNeil</wd:lastName>
    <wd:Age>40</wd:Age>
  </wd:Report_Entry>
  <wd:Report_Entry>
    <wd:Employee_ID>1236</wd:Employee_ID>
    <wd:firstName>Joy</wd:firstName>
    <wd:lastName>Banks</wd:lastName>
    <wd:Age>42</wd:Age>
  </wd:Report_Entry>
</wd:Report_Data>

XSLT Sample:

<?xml version="1.0" encoding="UTF-8"?>
<xsl:stylesheet xmlns:xsl="http://www.w3.org/1999/XSL/Transform"
   xmlns:wd="urn:com.workday.report/WD_Sample_Report" version="2.0">

<xsl:output method="text" indent="no"/>
<xsl:strip-space elements="*"/>

<xsl:variable name="NEWLINE" select="'&#xa;'"/>
<xsl:variable name="PIPE" select="'|'"/>

<xsl:template match="/">
    <!-- Header Record --> 
    <xsl:text>Employee ID</xsl:text>
        <xsl:value-of select="$PIPE"/>
<xsl:text>First Name</xsl:text>
        <xsl:value-of select="$PIPE"/>
<xsl:text>Last Name</xsl:text>
        <xsl:value-of select="$PIPE"/>
<xsl:text>Age</xsl:text>
<xsl:value-of select="$NEWLINE"/> 
<xsl:for-each select="wd:Report_Data/wd:Report_Entry">
    <!-- Detail Record --> 
        <xsl:value-of select="wd:Employee_ID"/>
                <xsl:value-of select="$PIPE"/>
    <xsl:value-of select="wd:firstName"/>
                <xsl:value-of select="$PIPE"/>
    <xsl:value-of select="wd:lastName"/>
        <xsl:value-of select="$PIPE"/>
    <xsl:value-of select="wd:Age"/>
        <xsl:value-of select="$NEWLINE"/>
 </xsl:for-each>

    <!-- Trailer Record --> 
 <xsl:text>End of Records</xsl:text>
 
</xsl:template>
</xsl:stylesheet>

Test

Use XLS Transformer to test the above code.

Result:


Employee ID|First Name|Last Name|Age| 1234|Steve|Morgan|56 1235|Logan|McNeil|40 1235|Joy|Banks|42 End of Records

Workday Catch Up Behavior - Scheduling Reports / Integrations

Catch Up Behavior - Scheduling

While scheduling the Reports or Integrations, you will come across Catch Up Behavior field which is mandatory. Using the Catch Up Behavior option enables you to limit how many times processes run after maintenance issues cause errors. 

You will see the below options available. First time scheduling you will only see (Run Once and None)
  • Run Once - Selecting this option will Catch Up one time if it missed.
  • None        -  Selecting this option will NOT Catch Up at all even though it missed.
  • Legacy     -  Selecting this option will Catch Up the old /earlier expired ones. This is going to be deprecated in the future. [Don't be surprised if you don't see this now]
Example: If you schedule a process to run multiple times in a day when your environment is down for maintenance, you can limit the process to run once instead of catching up all missed occurrences.

During the maintenance window / Unplanned outage, if your reports or integrations were supposed to be running as per the schedule during that time you will use Catch up Behavior selection to tell what you want to do on the missed recurrences.


Note: You can't limit processes for schedules with a minute recurrence.

Workday XSL Coding Tips

XSL Coding Tips


Using Variables (Declaration) :


<xsl:variable name="NEWLINE" select="'&#xa;'"/>
<xsl:variable name="PIPE" select="'|'"/>   [Use the delimiter that you would like to see in the output. Examples: Comma(,), Tab (    ), Pipe(|), SemiColon(;) ]
               <xsl:variable name="Record1" select="'C'"/>
               <xsl:variable name="Record2" select="'S'"/>

Using your Variable: (for above)


              <xsl:value-of select="$NEWLINE"/> [This takes the cursor to next line]
              <xsl:value-of select="$PIPE"/>  [This prints | ]
      <xsl:value-of select="$Record1"/>     [This prints C]
      <xsl:value-of select="$Record2"/>     [This prints S]

Using Fillers (Declaration):

    <xsl:variable name="Filler_Blank" select="'                                                                                                                            '"/>
            <xsl:variable name="Filler_Zeros" select="'0000000000000000000000'"/>

Using your Fillers and Substring Function: (for above)

             <xsl:value-of select="substring($Filler,1,10)"/>           [This prints 10 spaces, if you say 15 then it will print 15 spaces ]
             <xsl:value-of select="substring($Filler_Zeros,1,4)"/>  [This prints 0000 as you said 4]

Using Plain Text:


<xsl:value-of select="'TEST'"/>

Using Comment:


<!--  Your Comment Here  -->  

Using Choose:


    <xsl:choose>
<xsl:when test=" wd:Gender = 'Male' ">
   <xsl:value-of select="'M'"/>
        </xsl:when>
<xsl:when test=" wd:Gender = 'Female' ">
   <xsl:value-of select="'F'"/>
        </xsl:when>
        <xsl:otherwise>
                  <xsl:value-of select="'U'"/>
        </xsl:otherwise>
    </xsl:choose>

Using For:


<xsl:for-each select="wd:Report_Data/wd:Report_Entry">

          <Your Lines of code here>

        </xsl:for-each>

Using Templates:


    <xsl:template match="/">
        <xsl:call-template name="HeaderRecord"/>
        <xsl:call-template name="DetailRecords"/>
        <xsl:call-template name="TrailerRecord"/>
    </xsl:template>


    <xsl:template name="HeaderRecord">

          <Your Lines of code here>

    </xsl:template>


    <xsl:template name="DetailRecords">

          <Your Lines of code here>
    </xsl:template>


    <xsl:template name="TrailerRecord">

          <Your Lines of code here>
    </xsl:template>

Thursday, 23 April 2020

Workday EIB - Inbound Validation Only mode

EIB - Inbound Validation Only mode

How to Run EIB Inbound in Validation mode:

When you want to load some data into Workday, you typically use the EIB Inbound. You know you will use the three phases involved in EIB - Get Data, Transform Data, Deliver Data.

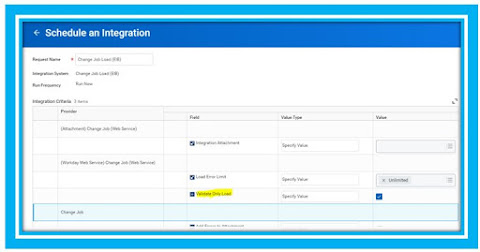
Its always a good approach to run your EIB Inbound integration load with Validation Only Load.

This helps you in identifying the issues so that you can fix it and proceed with the actual load.

Below shown is the screen when you click on Launch/Schedule integration. Here is where you set the Validation Only Load. When you are comfortable with the load validation, in the next launch just make sure that you don't select so that your run will not be a Validation only but an actual load.


Workday EIB Inbound - Validation Mode Setup

Workday EIB - Inbound Template Processing Instructions

EIB - Inbound Template Processing Instructions

Processing Instructions


While loading your file for EIB - Inbound, you will see the Processing Instructions Options to choose on your Overview Tab in the excel template.

Sample Hire Employee Template:

Here is the detailing on these BP related processing selection. Most widely used is Automatic Processing which avoids the approval workflow.


Workday Business Process

 Business Process

Business Process can be define for any Supervisory Organizations. The Business Process Logic is inherited, so sub ordinate organizations of the same business process defined for a superior organization, unless the subordinate organization has its own version of the process.

BUSINESS PROCESS FRAMEWORK
The Business process framework uses security groups to control who performs the activities that makeup a business process.
 Business process are created using a combination of actions, approvals, approval chains, to do's.
   The difference between actions, approvals and to dos.
ü Action: Tasks or events within the workday.
ü Approvals:  Approval of a task or event with in the workday.
ü To do: Reminder to do a task either with in the workday or outside the system

Action
Definition
Step
The related action icon appears in the left column and contains the available actions for a specific step of the business process

Order
This determines the order of execution for the steps within a business process. Workday uses letters to sequence steps as numbers are sorted alphabetically, not numerically, so 10 sorts before 2. The initiation step is always step “a”

Subsequent steps will use the characters to through z. For example: If three steps are d, they run parallel and all must be completed to kick off the next step. You can also skip letters. For example: a, b, c, d, f is okay, even though e is missing. In addition,  if you add an item with two letters, such as ca, it runs after step c and before step d.
If
A condition is part of business process step and consists of one or more rules. A condition rule is considered an “if” statements. If the condition is not satisfied the step will not occur.    
Type
This is where you Identify the type of step. For example: an action, service or to do.
Specify
This is where indicate the specifies based on the type of step.
Optional
An optional step does not have to be completed. You can skip This step, the Next step does not begin until the recipient either choose to skip it or complete it.
Group
Specify one or more security groups responsible for this step.
All
If the column is not cheeked as soon as one person in the role approve the request. Checking the column requires all persons in the security group to approve the request.
Run as user
Use to identify the user for a batch or integration step type.
Due date
This is the elapsed time from when the process is initiated until the process should be completed.
Routing Restrictions
Routing restrictions enable you to configure individual work flow steps so that selected individuals or excluded from the work flow routing based on your selections.
Complete
When a complete step finishes the business process listed as complete even if there are more step in the process.


Business Process Step Types

Step
Definition
Initiation
The initiation step is always the first step in a business process
Action
An action or event that occurs within workday. For example: an action step sub-process of Propose Compensation within the Hire business process.
Approval
An approval step gives the designated approver the opportunity to approve, deny or send back the entire business process.
Approval Chain
An approval chain also approves the entire process. An approval chain to a sequence of approvals that starts with an individual and then goes to that person’s manager and on up the management chain until it gets to the top or until some exit condition is met. Use the group column to set the role-based security group that starts the chain.
Batch/Job
You can specify that a batch process be run as a business process step. When creating or editing a business process. Simply add a step for the batch process (step the step type to batch and specify the batch process to use).
Checklist
A checklist is a collection of to dos. Select one of the existing checklists or create a new one.

Step
Definition
Consolidated Approval
A consolidated approval enables you to combine multiple approvals for the same person into a single approval task notification. When the approvals link to the approval page, they see simplified information for each step, but with a link to more information if they need more detail. As with a single approval, if the approver denies the approval the entire business process is denied and terminated.
You can include more than one Consolidated Approval step in a business process to eliminate numerous individual approvals.
Consolidated Approval chain
This step type combines the properties of a consolidated approval step and an approval chain step: It must also be configure from the view mode after you have added it to a business process definition.
Integration
An integration step is a workday system operation that transfers data to or from an external application. An integration step would also kick off a separate processing thread.
Service
A service step kicks off a separate processing thread (e. g: creation of a workday user account)
Review Documents
This step type enables you to use a business process to distribute documents to workers. To make a document available to a workday business process, you must first add the document to workday using the create Document task. This task allows you to upload a document directly as an attachment or provide a direct link to a document on an external system.
To Do
A to do is an activity that the responsible person must do. Such as a new hire filling in and submitting a W- 4 form. You can embed a Workday task in a to do item. Anyone who then receives the to do as part of a business process will see a button ( in Work feed) or a link (in email) that takes them directly to the task where they can take action immediately on the to do item.

Business Processes

Staffing

· Create Position
· Edit Hiring Restrictions
· Create Headcount
· Edit Position
· Contract Contingent Worker
· Change Job
· End Contingent Worker Contract
· Terminate
· Transfer Contingent Worker
· Hire

Compensation

· Request One- time Payment
· Request Compensation Change (ad hoc)
· Request Stock Grant
· Propose Compensation Change (within a staffing event)
· Propose Employee bonus award
· 
· Request employee merit adjustment
· Propose Compensation ( within a hire event)

Benefit Events  

· Change Benefits
· Change Benefits for open Enrollment
· Change Benefits for life events
· Change Refinement Savings.
Time Off/Leave Events

· Request time Off
· Correct Time Off
· Request Leave of Absence
· Request Return from Leave of Absence

Talent Management Events

· Start Performance Review
· Start Performance Improvement Plan
· Start Development Plan
· Start Disciplinary action

Personal Data Events

· Date of Birth Correction
· Edit ID Information
· Personal Information Change
· Marital Status Change  


Contact Information Events

· Legal Name Change
· Preferred Name Change
· Create Primary Address
· Change Primary Address

Workday Custom Reports

Custom Reports Apart from  Workday - Standard Reports , Workday allows you to create Custom Reports. There are variety of reports that ...